

Different ways to materialize assets in Dagster
Start your free 7-days trial now!
Materializing assets
One basic way of materializing assets is using the Dagster UI. We can also materialize assets programmatically like so:
Dagster's command line interface (CLI).
Dagster's Python package.
Setting up a basic Dagster environment
Suppose we have the following main.py file:
Materializing assets using command line interface
Let's first check what assets are defined in our file (-f):
                    dagster asset list -f main.py


            iris_datasetosa
Note that this command does not require a Dagster server to be running, that is, this command will directly look into your Definitions object and find the assets of our data pipeline.
We can materialize the iris_data asset like so:
                    dagster asset materialize --select iris_data -f main.py


            2023-08-01 22:47:13 +0800 - dagster - DEBUG - __ASSET_JOB - ef54ee05-2c17-459b-a5b3-40eca4180d4d - 97314 - RUN_START - Started execution of run for "__ASSET_JOB".2023-08-01 22:47:13 +0800 - dagster - DEBUG - __ASSET_JOB - ef54ee05-2c17-459b-a5b3-40eca4180d4d - 97314 - ENGINE_EVENT - Executing steps using multiprocess executor: parent process (pid: 97314)2023-08-01 22:47:13 +0800 - dagster - DEBUG - __ASSET_JOB - ef54ee05-2c17-459b-a5b3-40eca4180d4d - 97314 - iris_data - STEP_WORKER_STARTING - Launching subprocess for "iris_data".2023-08-01 22:47:13 +0800 - dagster - DEBUG - __ASSET_JOB - a75c538c-9b3f-42fd-a5e5-2410bad62511 - iris_data - Writing file at: /Users/isshininada/Desktop/dagster_demo/tmpp_2pd1q6/storage/iris_data using PickledObjectFilesystemIOManager......
As shown in the output, the problem with this is that the materialized assets are written in a temporary folder in the current working directory. This temporary folder is deleted as soon as the command is completed, which means that we won't be able to access the materialized assets.
To persist our materialized assets, we can specify the DAGSTER_HOME environment variable using an .env file like so:
DAGSTER_HOME=/Users/isshininada/Desktop/dagster_demo/my_dagster_home
To learn more about DAGSTER_HOME and how Dagster persists run data, please refer to our guide here.
Create a new folder called my_dagster_home in the current working directory. Our current directory should like the following:
.envmain.pymy_dagster_home/
Let's materialize our asset once more:
                    dagster asset materialize --select iris_data -f main.py


            ...2023-08-01 23:00:21 +0800 - dagster - DEBUG - __ASSET_JOB - c20f9e18-604c-44f4-bda8-e478dde2b7db - iris_data - Writing file at: /Users/isshininada/Desktop/dagster_demo/my_dagster_home/storage/iris_data using PickledObjectFilesystemIOManager......
We should see our materialized assets persisted in our my_dagster_home folder like so:
.envmain.pymy_dagster_home├── ...└── storage └── iris_data
Again, to understand how Dagster persists run data, please consult our guide here.
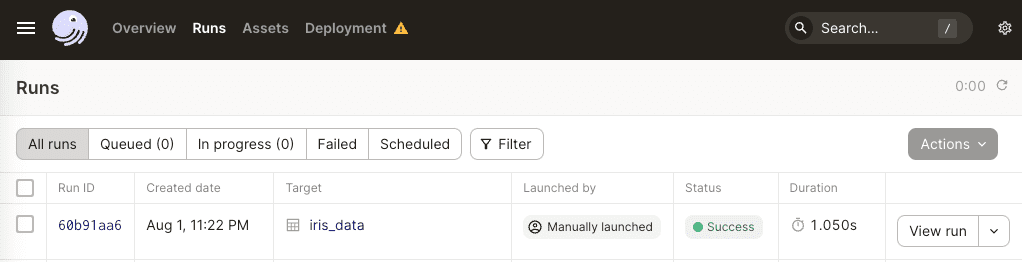
We would not have been able to materialize the setosa asset without first materializing the iris_data since setosa depends on the materialized iris_data:
                    dagster asset materialize --select setosa -f main.py


            dagster._core.errors.DagsterExecutionLoadInputError: Error occurred while loading input "iris_data" of step "setosa"::
Since the run data is persisted under my_dagster_home, we have access to it via the Dagster UI. Let's modify our pervious main.py to make it a code location:
from dagster import asset, Definitionsimport pandas as pd
@asset(name="iris_data")def get_iris_data():
@asset(name="setosa")def get_setosa(iris_data):
defs = Definitions(assets=[get_iris_data, get_setosa])
Launch the Dagster UI like so:
                    dagster-webserver -f main.py


            ...2023-08-01 23:19:56 +0800 - dagster-webserver - INFO - Serving dagster-webserver on http://127.0.0.1:3000 in process 97882
In the Dagster UI, we will then be able to see our run:
For now, this approach of materializing assets via the command line is rather limited since:
the
--selectflag is mandatory, which means we have to specify the asset we wish to materialize. To my understanding, we cannot specify multiple assets at once using--selectnor can we materialize all assets at once.
Materializing assets using Python package
To demonstrate, here's our Dagster setup:
.venvmy_dagster_code_location├── main.py└── my_assets.py
Where my_assets.py is the same as before:
Materializing specific assets
Consider the following main.py file:
                    from dagster import materialize, DagsterInstancefrom my_assets import get_iris_data, get_setosaimport os
if __name__ == "__main__":    # We need to set the environmental variable DAGSTER_HOME    os.environ["DAGSTER_HOME"] = "/Users/isshininada/Desktop/dagster_demo/my_dagster_home"    with DagsterInstance.get() as instance:        materialize([get_iris_data, get_setosa], instance=instance)
Note the following:
we cannot use Dagster's approach of defining the
DAGSTER_HOMEenvironment variable in a.envfile and accessing it viaEnvVar. This is becauseEnvVarcan only be used when spawning up a Dagster server (e.g. viadagster-webserver).we don't require a running Dagster server to use the Dagster instance.
Let's now run our Python file:
                    python my_dagster_code_location/main.py


            2023-07-17 13:00:24 +0800 - dagster - DEBUG - __ephemeral_asset_job__ - 94fd8a34-cb40-45a3-843a-3643754b4067 - 45739 - RUN_START - Started execution of run for "__ephemeral_asset_job__".2023-07-17 13:00:24 +0800 - dagster - DEBUG - __ephemeral_asset_job__ - 94fd8a34-cb40-45a3-843a-3643754b4067 - 45739 - ENGINE_EVENT - Executing steps in process (pid: 45739)...
This will output the materialized assets and run-related data within the my_dagster_home directory.
In the Dagster UI, we should see a new run:

Here, we see that Dagster has created a temporary job called __ephemeral_asset_job__ behind the scenes. Since this is only a one-off job, we will not see __ephemeral_asset_job__ under Deployment > Jobs.
Clicking this job will give us more insights such as what assets were created:
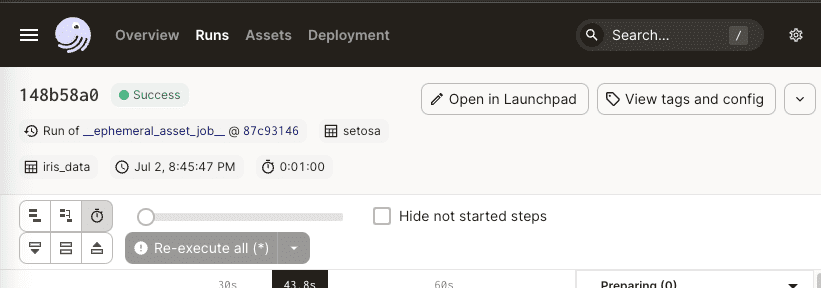
Here, we see that assets iris_data and setosa were materialized - just as expected.
Materializing assets without defining DAGSTER_HOME
Technically, we could still materialize directly without defining the DAGSTER_HOME environment variable like so:
                    from my_assets import get_iris_data, get_setosafrom dagster import materialize
if __name__ == "__main__":    materialize([get_iris_data, get_setosa])
However, the problem with this is that Dagster will output the materialized assets in a temporary path in your OS. For instance, the iris_data asset gets outputted in the following temporary path:
/var/folders/1r/7zf_mfdn2bd_h1t6nx_pyj4r0000gn/T/tmp4u552nil/storage/iris_data
Not only is this undesirable but also these files get automatically deleted by Dagster at the end of the execution. Therefore, we wouldn't be able to even access these materialized assets afterward. To persist our assets, we typically set either:
set the
DAGSTER_HOMEenvironment variable and supply the Dagsterinstanceto thematerialize(-)function. This will persist our run data and materialized assets under the folder whose path is specified byDAGSTER_HOME.supply an IO manager as a
resourceto thematerialize(-)function. We will demonstrate this later.
Just like in the case of Dagster CLI, we must specify all the upstream assets when materializing the individual downstream assets. For instance, since setosa depends on the iris_data asset, we cannot materialize just the setosa asset (unless the iris_data has already been materialized).
We can get around this by materializing all assets in specific modules - we will demonstrate this in the next sectionlink.
Materializing all assets in modules
Previously, we materialized assets by importing them individually and then placing them inside the materialize(-) method. We can also import all assets in the specified modules like so:
                    from dagster import materialize, DagsterInstance, load_assets_from_modulesimport my_assetsimport os
if __name__ == "__main__":    all_assets = load_assets_from_modules([my_assets])    # We need to set the environmental variable DAGSTER_HOME    os.environ["DAGSTER_HOME"] = "/Users/isshininada/Desktop/dagster_demo/dagster_home"    with DagsterInstance.get() as instance:        materialize(all_assets, instance=instance)
What's nice about this approach is that we no longer have to specify all upstream assets - Dagster will understand the dependencies and materialize the assets in the correct order as long as they reside in the module.
Materializing assets using resources
We can also specify Dagster resources such as IO managers in our materialize(-) function. For instance, consider the following main.py file:
from dagster import Definitions, asset, FilesystemIOManager, materialize, DagsterInstanceimport pandas as pd
@asset(name="iris_data")def get_iris_data():
if __name__ == "__main__": materialize( assets=[get_iris_data], resources={ "io_manager": FilesystemIOManager(base_dir="my_output") } )
Note the following:
we are using the
FilesystemIOManagerto write our materialized assets in themy_outputdirectory. For a detailed explanation on Dagster's IO managers, please consult our Guide on IO Managers.we did not define the
DAGSTER_HOMEenvironment variable, which means that our run-related data will be stored in a temporary folder that is deleted right after execution. The materialized assets, on the other hand, will be stored and persisted in themy_outputdirectory.if we want to persist our run-related data as well, define the
DAGSTER_HOMEenvironment variable and pass in the Dagster instance as we did in our previous example.
Let's now run this Python script:
python main.py
Our materialized assets will end up in the my_output folder like so:
main.pymy_output└── iris_data
Materializing assets in parallel
By default, Dagster uses the total number of CPUs available in the machine to materialize assets in parallel. Since I am using a M1 Mac equipped with 8 CPUs, this means that I can materialize 8 assets at once as long as they don't have any dependencies on each other!
Specifying configuration in Dagster UI
We can specify the number of assets that can be materialized in parallel as a configuration in Dagster UI. For instance, consider the following two assets:
                    from dagster import asset, Definitions
@asset(name="asset_one")def get_asset_one():    while True:        1 + 1
@asset(name="asset_two")def get_asset_two():    while True:        1 + 1
defs = Definitions(assets=[get_asset_one, get_asset_two])
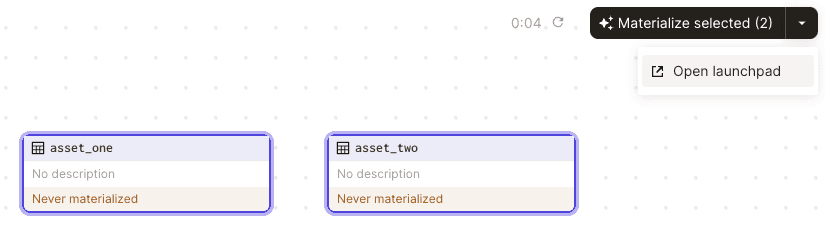
Clearly, these two assets do not depend on each other, which means they can be materialized simultaneously. Launch the Dagster UI and select both the assets. Next, click on the small down arrow in the materialize button and click on Open launchpad like so:
Let's first limit ourselves so that we materialize assets sequentially. In the launchpad, copy and paste the following:
execution: config: multiprocess: max_concurrent: 1
Click on the Materialize button at the bottom-right corner. We should then see a spinner in one asset but not in the other like so:

This means that Dagster is materializing only asset_one at the moment but not asset_two. Now, terminate the run and set max_concurrent to 2 so that both assets can be materialized in parallel. We should then see both assets getting materialized at the same time like so:

Note that the default value of max_concurrent is the output of the following:
                    import multiprocessingmultiprocessing.cpu_count()


            8