

Comprehensive Guide on IO Managers in Dagster
Start your free 7-days trial now!
What is an IOManager in Dagster?
The IO manager handles where data is read from as well as where it is written to. Recall from our Getting Started with Dagster guide that Dagster writes assets and run-related data to a temporary folder that is deleted when the Dagster server is terminated.
We can also store our output files permanently in a remote blob storage (e.g. Google Cloud Storage) or in a persistent folder within our local repository that will not be deleted even after terminating the Dagster server. One way of achieving this is by using IO managers.
Setting up our Dagster environment
To demonstrate how to use IOManagers in Dagster, we need to first set up our own Dagster environment. We will use the same simple setup as the one used in our Getting Started with Dagster guide:
my_dagster_code_location├── __init__.py└── my_assets.py
Where the __init__.py is:
                    from dagster import Definitions, load_assets_from_modulesfrom . import my_assets
all_assets = load_assets_from_modules([my_assets])defs = Definitions(assets=all_assets)
And the my_assets.py is:
For an explanation of what all of this code mean, please refer to our Getting Started with Dagster guide.
Saving to a persistent local folder
As a simple example, let's use the FilesystemIOManager to write our assets in a persistent local folder. All IOManagers are a Dagster resource, which means we must specify them in our Definitions object in the root __init__.py file like so:
                    from dagster import Definitions, load_assets_from_modules, FilesystemIOManagerfrom . import my_assets
all_assets = load_assets_from_modules([my_assets])io_manager = FilesystemIOManager(base_dir="my_data")
defs = Definitions(    assets=all_assets,    resources={        "io_manager": io_manager,    },)
By default, all our assets (defined in my_assets.py) will use the IOManager defined under the io_manager key unless specified otherwise.
Now, launch the Dagster UI server like so:
                    dagster dev -m my_dagster_code_location


            ...2023-07-15 13:22:52 +0800 - dagit - INFO - Serving dagit on http://127.0.0.1:3000 in process 49252
Head over to the Dagster UI and click on the Materialize all button. We should see a new folder called my_data, and within it, our materialized assets like so:
my_dagster_code_location├── __init__.py└── my_assets.pymy_data├── iris_data└── setosa
Here, the path of the my_data directory is determined based on the path we were at when we launched the Dagster server. Since we launched the server in the root project directory, this is where Dagster created the my_data directory.
We can also see the path of our iris_data in the Dagster UI by clicking on the iris_data node in the graph:
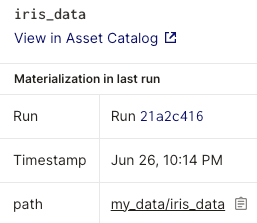
By default, the materialized assets are in pickle format. We will later define our custom IO manager to save our assets in another format (csv). Note that even when we terminate the Dagster server, the my_data folder will not be deleted.
Defining a custom IO manager
To define a custom IO manager, we can create a class that extends Dagster's ConfigurableIOManager class. As an example, let's define an IO manager in a new file called my_io_manager.py that writes to and reads from a Pandas DataFrame as a CSV file:
from dagster import ConfigurableIOManager, InputContext, OutputContextimport pandas as pd
class MyIOManager(ConfigurableIOManager):
def _get_path(self, context) -> str: return "/".join(context.asset_key.path) + ".csv"
def handle_output(self, context: OutputContext, df: pd.DataFrame):
def load_input(self, context: InputContext) -> pd.DataFrame:
Note the following:
the methods
handle_output(-)andload_input(-)are mandatory. These are the two main methods that perform the write and read, respectively.the first parameter of the methods
handle_output(-)andload_input(-)is Dagster'scontextobject, which includes useful information such as the name of the asset that is to be written/read. The second parameter depends on our use case - since our assets are a Pandas DataFrame, this parameter will be a Pandas DataFrame.the
context.asset_key.pathproperty is a list holding the paths of the asset. In our case, it is a simple list containing only the name of the assets (["iris_data"]and["setosa"]).
Since IO managers are a Dagster resource, we must update our Definitions in the __init__.py file like so:
                    from dagster import Definitions, load_assets_from_modulesfrom . import my_assetsfrom .my_io_manager import MyIOManager
all_assets = load_assets_from_modules([my_assets])
defs = Definitions(    assets=all_assets,    resources={        "my_io_manager": MyIOManager()    })
Next, we must add a new property io_manager_key to the asset decorators in our my_assets.py file like so:
from dagster import assetimport pandas as pd
@asset(name="iris_data", io_manager_key="my_io_manager")def get_iris_data():
@asset(name="setosa", io_manager_key="my_io_manager")def get_setosa(iris_data):
Note that if we use the key io_manager instead of my_io_manager, we would not have to add io_manager_key property in the asset decorator since all assets use the IO manager defined under io_manager by default.
Now, head over to the Dagster UI, reload the definitions and materialize all assets. We should now be able to see our materialized assets in CSV format:
my_dagster_code_location├── __init__.py├── my_io_manager.py└── my_assets.pyiris_data.csvsetosa.csv
Passing in a configuration
We can customize our IO managers programmatically by defining custom properties. To demonstrate, let's create a new property called path_prefix, which indicates where we wish to store and read the CSV file:
from dagster import ConfigurableIOManager, InputContext, OutputContextimport pandas as pdimport os
class MyIOManager(ConfigurableIOManager):
path_prefix: str = ""
def _get_path(self, context) -> str: os.makedirs(self.path_prefix, exist_ok=True) # make sure the directory exists return self.path_prefix + "/".join(context.asset_key.path) + ".csv"
def handle_output(self, context: OutputContext, df: pd.DataFrame):
def load_input(self, context: InputContext) -> pd.DataFrame:
In our __init__.py file, we can pass in the parameter path_prefix when instantiating the MyIOManager like so:
                    from dagster import Definitions, load_assets_from_modulesfrom . import my_assetsfrom .my_io_manager import MyIOManager
all_assets = load_assets_from_modules([my_assets])
defs = Definitions(    assets=all_assets,    resources={        "my_io_manager": MyIOManager(path_prefix="my_data/")    })
Now, when we materialize our assets, we will get:
...my_data├── iris_data.csv└── setosa.csv
Passing in a configuration using environment variables
To demonstrate how we can read environment variables in Dagster, suppose we have a .env file like so:
DATA_PATH=my_data/
The current file structure of our project looks like so:
.envmy_dagster_code_location├── __init__.py├── my_io_manager.py└── my_assets.py
In our __init__.py, we can read the environment variable using Dagster's EnvVar class like so:
                    from dagster import Definitions, load_assets_from_modules, EnvVarfrom . import my_assetsfrom .my_io_manager import MyIOManager
all_assets = load_assets_from_modules([my_assets])
defs = Definitions(    assets=all_assets,    resources={        "my_io_manager": MyIOManager(path_prefix=EnvVar("DATA_PATH"))    })
Materializing our assets will give us the following:
.envmy_dagster_code_location/my_data├── iris_data.csv└── setosas.csv
We could read environment variables using Python's os.env(-) or dotenv package but using Dagster's EnvVar is the standard practice when using Dagster. This is because the name of the environment variables will appear in the Dagster UI only when using EnvVar.
Let's see our environment variable in the Dagster UI. Click on Deployment in the header to get:
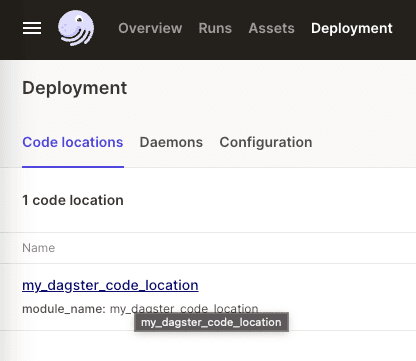
Click on our code location and then click on the Resources tab:
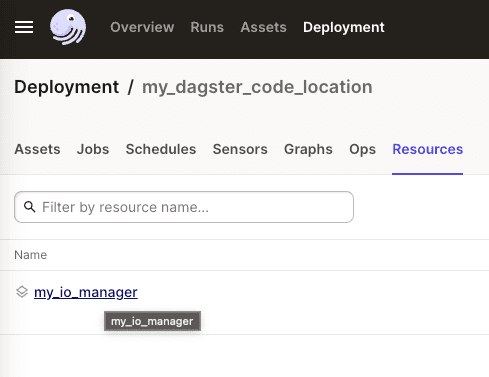
Click on our custom resource manager and we will see the configuration (defined as an environment variable) for this resource:
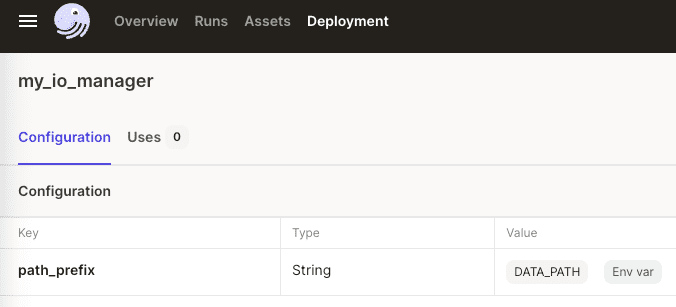
We see that the path_prefix configuration parameter is assigned the value of DATA_PATH, which is defined as an environment variable!
Logging asset metadata
When defining custom IO managers, we can also log metadata about our outputs. Let's extend our previous example such that we also log some metadata about our output DataFrames:
from dagster import ConfigurableIOManager, InputContext, OutputContextimport pandas as pdimport os
class MyIOManager(ConfigurableIOManager):
path_prefix: str = ""
def _get_path(self, context) -> str: os.makedirs(self.path_prefix, exist_ok=True) return self.path_prefix + "/".join(context.asset_key.path) + ".csv"
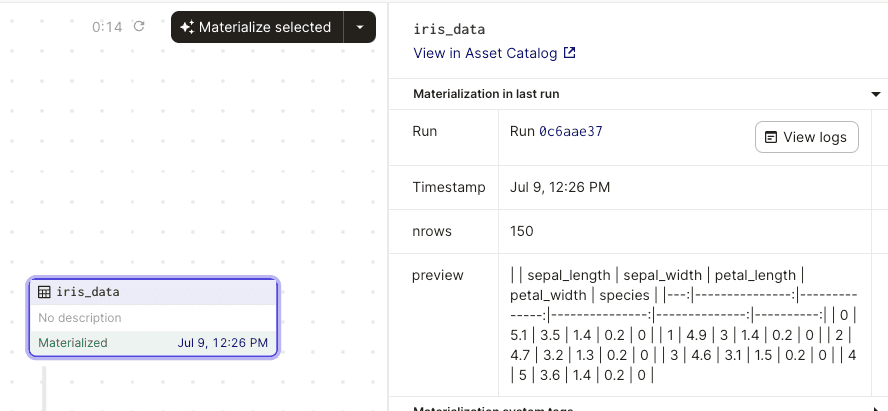
def handle_output(self, context: OutputContext, df: pd.DataFrame): context.add_output_metadata({ "nrows": len(df), }) df.to_csv(self._get_path(context))
def load_input(self, context: InputContext) -> pd.DataFrame:
Now, materialize our assets using Dagster UI. If we click on our materialized assets, we should see the logged metadata:
Using built-in blob storage IO managers
Dagster provides IO managers that connect to popular blob storages such as Google Cloud Storage, AWS S3 and Azure Blob Storage. In this section, we will demonstrate how to use the Azure Blob Storage IO manager, but setting up the other two IO managers should be very similar.
The built-in IO manager for Azure Blob Storage is only for Azure Data Lake Storage Gen2 (adls2). This does not work for the legacy Azure Blob storage unless you manually upgrade it via the Azure portal.
By default, the built-in IO managers are not part of the core dagster package. Therefore, we must install them like so:
pip install dagster-azure
Now, consider the following main.py file:
                    from dagster import Definitions, assetfrom dagster_azure.adls2 import adls2_pickle_io_manager, adls2_resource
@assetdef asset_one():    return 3
@assetdef asset_two(asset_one):    return asset_one + 2
defs = Definitions(    assets=[asset_one, asset_two],    resources={        "io_manager": adls2_pickle_io_manager.configured(            {                "adls2_file_system": "democontainer",   # name of the container                "adls2_prefix": "my_dagster",           # name of the directory to place data            }        ),        "adls2": adls2_resource.configured({            "storage_account": "demostorageskytowner",            "credential": {                "sas": "?sv=2022-11-02&ss=bfqt&s*****"            }        }),      },)
Note the following:
under
resources, we must specify bothio_managerandadls2.under
io_manager, we supply the container name and the directory where the data will be stored.under
adls2, we specify the storage account name as well as the credential (SAS token).
Now, launch the Dagster UI like so:
dagster dev -f main.py
Let's materialize all the assets using the Materialize all button. Here's what happens:
asset_oneis materialized and written to Azure Blob Storage.asset_oneis read from Azure Blob Storage andasset_twois materialized.asset_twois written to Azure Blob Storage.
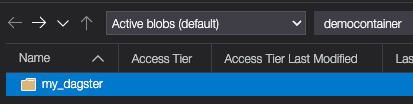
In our Azure Blob Storage, we should see our my_dagster folder at the root level:
Within the my_dagster directory, we should see both our assets:
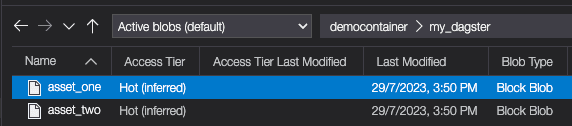
These are pickle files - if we wish to output them in other formats (e.g. CSV or parquet), we must write our own custom IO manager. Personally, I feel that these built-in IO managers are neither intuitive nor flexible to use, so I would just go ahead and write my own custom IO manager.