Comprehensive guide on using Google Colab with Google Sheets
Start your free 7-days trial now!
Why use Google Colab with Google Sheets?
Google Colab is a free interactive notebook that allows you to run Python code on Google's virtual machines. One of the key selling points of Google Colab is that we can leverage Google's powerful GPU-equipped machines that come with 13GB of memory and over 100GB of disk space all without paying a penny. This means that Google Colab is more capable of manipulating and analyzing large amounts of data compared to Google Sheets!
On top of this, Google Colab comes with pre-installed data-related libraries like pandas and scikit-learn. Pandas allow you to manipulate your data much faster and more flexibly than in Google Sheets - check out our guide on getting started on Pandas for a quick introduction. Google Colab also allows you to build powerful machine learning models with libraries such as scikit-learn and tensorflow to make predictions and derive insights.
Connecting Google Colab with Google Sheets
Before connecting Google Colab with Google Sheets, we must first give access to Google Drive on Colab using auth.authenticate_user():
from google.colab import authauth.authenticate_user()
Log in to your Google account that has access to the Google Sheets:

We then connect and authenticate with Google sheets using the pre-installed gspread module:
from google.auth import defaultimport gspreadcreds, _ = default()gc = gspread.authorize(creds)
We can now proceed with interacting with the data in Google Sheets using Google Colab.
Importing data from Google Sheets to Google Colab
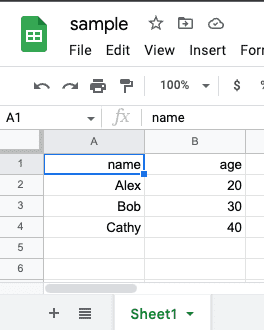
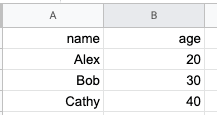
Suppose we have a Google Sheet called sample in the root directory:
The content of the sample file is as follows:
To get the data inside this Google Sheet:
[{'name': 'Alex', 'age': 20}, {'name': 'Bob', 'age': 30}, {'name': 'Cathy', 'age': 40}]
Here, note the following:
we can open up this Google Sheet using the
open('sample')functionwe can access the first sheet using the property
sheet1the
get_all_records()method returns a list of dictionaries containing all the data stored in this sheet
You could also fetch the data as a list of lists using the get_all_values(~) method:
[['name', 'age'], ['Alex', '20'], ['Bob', '30'], ['Cathy', '40']]
Reading the data stored in Google Sheets as a Pandas DataFrame
To read the data stored in Google Sheets as a Pandas DataFrame, simply pass the list of dictionaries returned by get_all_records() to the DataFrame constructor:
Reading data using cell range
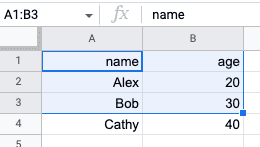
Suppose we wanted to fetch the values in range A1:B3:
We can use the get(~) method of a worksheet:
                    worksheet = gc.open('sample').sheet1worksheet.get('A1:B3')


            [['name', 'age'], ['Alex', '20'], ['Bob', '30']]
Reading a specific row
To get the 2nd row, call row_value(2):
                    worksheet = gc.open('sample').sheet1worksheet.row_values(2)


            ['Alex', '20']
Reading a specific column
To get the 2nd column, call col_values(2):
                    worksheet = gc.open('sample').sheet1worksheet.col_values(2)


            ['age', '20', '30', '40']
Exporting data to Google Sheets from Google Colab
In most cases, the format in which you deal with data on Google Colab will be a Pandas DataFrame. If it is not (e.g. a list of numbers), then I highly recommend converting that into a DataFrame first.
Consider the following Pandas DataFrame:
The first step in exporting this DataFrame into Google Sheets is to convert the DataFrame into a list of lists:
Here, the first list contains the column labels while the rest are the values of the DataFrame.
Next, we create a new Google Sheets file using the create(~) function, which returns a GoogleSheets object. We then access the sheet1 property, and then perform the update:
                    sheet = gc.create('new_sheet').sheet1sheet.update(values)


            {'spreadsheetId': '1otc5DNi-6EPBbTAoaKwrwCJV5X78iH8ZEa1KdDLpgyA', 'updatedCells': 6, 'updatedColumns': 2, 'updatedRange': 'Sheet1!A1:B3', 'updatedRows': 3}
Here, we can see that the update(~) method has returned a dictionary containing some information about how the sheet was populated.
If a Google Sheet with the same name exists, then the create(~) method will overwrite that file.
After running this code, we should see our newly created Google Sheets:
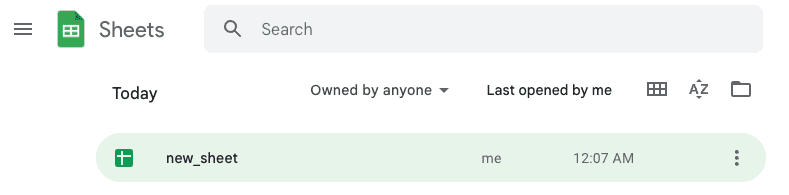
Opening this file reveals the following:

For your convenience, here's a function that combines our code snippets in one single operation:
We call this method like so:
write_df_to_sheets(df, 'new_sheet')
Appending new rows to Google Sheets
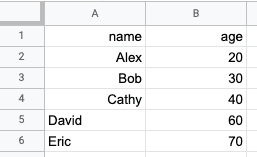
Suppose our Google Sheet called sample was as follows:
We can append new rows by using the worksheet's append_row(~) method:
                    worksheet = gc.open('sample').sheet1worksheet.append_rows([['David', 60], ['Eric', 70]])


            {'spreadsheetId': '1Myb733ychkWFNipd75YFX6glZTE0o0Sgx-yaUpz58G8', 'tableRange': 'Sheet1!A1:B4', 'updates': {'spreadsheetId': '1Myb733ychkWFNipd75YFX6glZTE0o0Sgx-yaUpz58G8',  'updatedCells': 4,  'updatedColumns': 2,  'updatedRange': 'Sheet1!A5:B6',  'updatedRows': 2}}
Running this code would give us the following updated Google Sheet:
General workflow of using the gspread library
The gspread library comes with methods that allow you to manipulate data on Google Sheets (e.g. append_rows(~) for appending new rows). However, the methods are limited and you'll find that in most cases there is no built-in method to achieve what you're trying to do. Therefore, the general workflow is to read the data in Google Sheets using a Pandas DataFrame, and then perform data manipulation using Pandas.
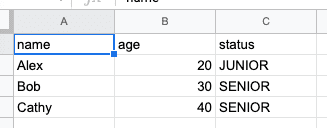
As an example, suppose we have the following Google Sheets called sample:
Now suppose we wanted to add a new column called status, which is a categorical column holding the values 'JUNIOR' or 'SENIOR' based on the age value. We cannot do this using the gspread library, so we need to use Pandas.
Once again, to import the data in Google Sheets as a Pandas DataFrame:
Let's append the new column status using NumPy's where(~) method:
Finally, let's call our method write_df_to_sheets(~) that we defined earlier:
write_df_to_sheets(df, 'new_sheet')
We should then see a new Google sheet called new_sheet with the appended status column: